
Okay, I said no jargon, but there's still some important vocabulary to add to your lexicon as you learn photography fundamentals. Exposure is one of those core terms. Before we dive into any techniques or tips, a foundational understanding in Exposure will greatly accelerate your photography learning journey.
What Exposure Really Means
This is the part of every photography book where the writer waxes poetic about the ancient Greek meaning of photography: "drawing with light." Fun factoid that might win you a beer at your local bar's next trivia night, otherwise completely useless to know.
Here's a more human way to think about it: Exposure is literally how much light you allow to touch your camera's film or sensor. More light = more bright, and vice versa.
Your camera controls exposure with three core settings. Think of it like filling a bucket with water:
- Aperture is how wide the tap opens.
- Shutter Speed is how long the tap runs.
- ISO is how big the bucket is. (inverted, but I'll explain)
The goal is to fill the bucket just right—not overflowing, not empty.
The Three Sides of the Triangle
- Aperture controls the size of the lens opening. This setting is usually described in terms of "f-stops," like f/1.4, f/16, and so on. A wider aperture (lower f-number, like f/2.8) lets in more light but makes the parts of your picture outside of your focus point blurrier. Another vocabulary term, this effect is called depth of field. A narrower aperture (higher f-number, like f/16) lets in less light but increases depth of field.
- Shutter Speed controls how long the sensor is exposed to light. A fast shutter freezes motion; a slow shutter lets in more light but can introduce blur.
- ISO controls the sensor’s (or film's) sensitivity. Higher ISO brightens the image but can add noise; lower ISO gives cleaner results but needs more light. In the bucket example, ISO 200 requires more light (bigger bucket) than ISO 1600 (smaller bucket).
Each setting affects both exposure and creative look. Adjusting one usually requires compensating with another.
Balancing the Triangle
You're probably thinking "what do you mean, compensate?" Welcome to photography: an endless parade of what the heck does that mean? moments.
Let's look at a practical example.
I took the below photo of the Arctic Cathedral from a hotel window in Tromsø, Norway. It was obviously night, so I knew I'd need a longer shutterspeed to properly expose the image. I also knew I didn't want a noisy image, but at the same time I knew I also wanted a tack sharp image throughout the frame (as little depth of field as possible). The only blurry area I wanted was the motion on the water, which was capturing dancing reflections that add a lot of color and visual interest to the scene.
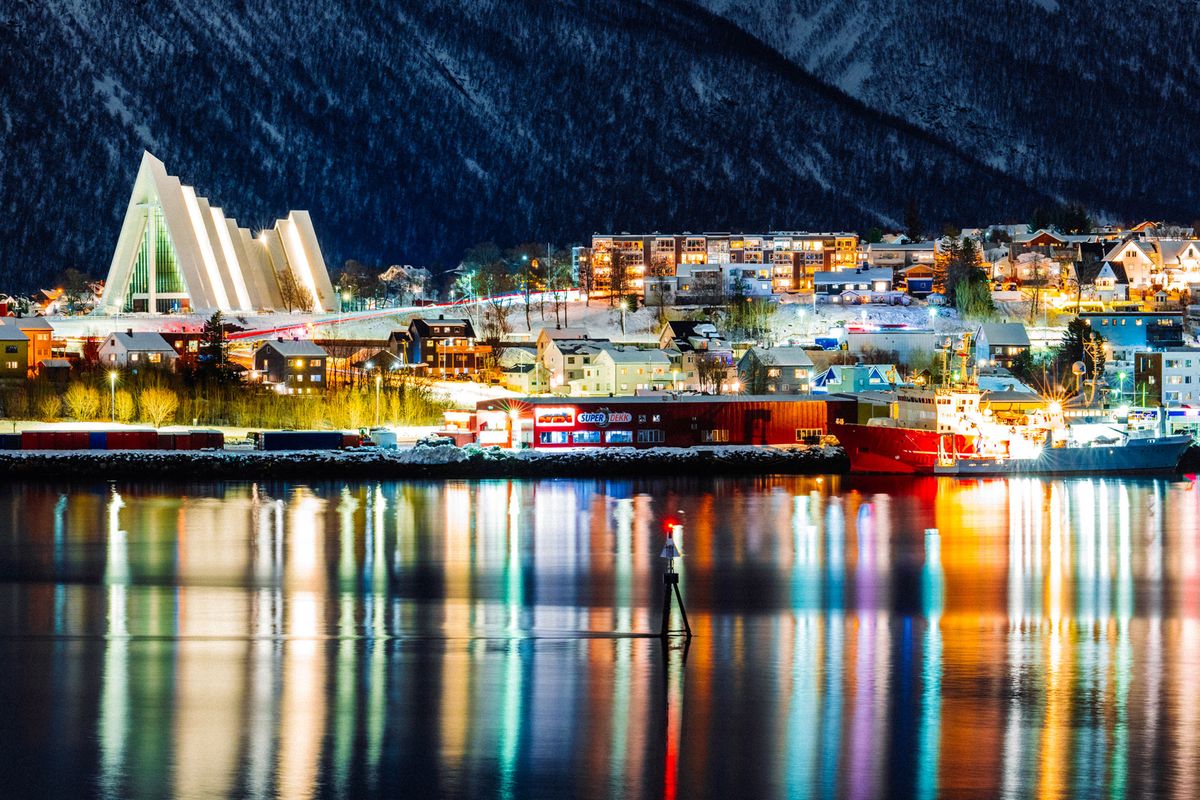
To achieve low noise, I chose a low ISO.
To achieve a sharp image with limited depth of field, I set my aperture to f/14
To ensure the image was properly exposed with those two choices made, I had to use a shutterspeed of 30 seconds.
The end result was a pleasantly glassy Arctic Ocean reflecting the colorful city lights with both the city and the mountain behind it in sharp focus. You can also see headlight/taillight trails, which imparts a sense of movement and life to the photo.
Common Beginner Mistakes
Growing up, my dad loved to say "experience is the best teacher, but not all of those experiences have to be your own." He might be right. I'll never know because throughout my life, my mistakes have offered the most memorable lessons.
Whether you learn best from others or yourself, here are some of my top tips for beginner photographers:
- Don't rely entirely on Auto mode — It’s convenient, but doesn’t teach you why your camera makes the choices it does. The faster you throw yourself into the deep end, the faster you'll learn how exposure settings can become a conduit for creativity.
- That said, Aperture priority and Shutter priority modes allow you to experiment with editing just one setting while automatically adjusting the other. Many cameras also feature "Auto-ISO," which does exactly what it sounds like: adjusts the ISO to the lowest possible setting to make a balanced exposure. These modes can help you focus on understanding one leg of the exposure triangle at a time.
- Don't push ISO too high — Newer digital cameras are better at handling noise, but excessive ISO still degrades image quality. Using automatic ISO can soften the learning curve, but it also reduces your creative control over any given photo—and your camera is going to default towards a higher ISO in lower light, making for noisy/grainy images.
- Ignoring depth of field — Aperture affects not just brightness but how your image feels. A blurred background can be beautiful, but it can also unintentionally obscure important details.
- Don't be hard on yourself — This applies to more than just photography. No matter how good your shots are in your first few weeks/months/years... Most photographers look back at their earlier works with a weird mix of embarrassment and pride. That's just part of the creative process. You make creative choices, you find out what works and what doesn't. Maddeningly, you'll also learn what works in some situations but not in others. It's a field rife with contradictions, so give yourself some grace. You're doing this for fun!
A Simple Practice Exercise
Find a well-lit outdoor scene. Set your camera to manual mode. Start with f/5.6, 1/250s, ISO 100. Take a shot.
Then adjust one setting at a time and observe what happens:
- Open the aperture to f/2.8 → background blur increases, exposure brightens.
- Slow the shutter speed → image brightens, motion blur may appear.
- Raise the ISO → image brightens, but noise increases.
This kind of hands-on practice makes the exposure triangle intuitive much faster than memorizing charts.
Final Thoughts
The exposure triangle is the foundation of photography. Once you understand how aperture, shutter speed, and ISO interact, you gain real control over your images. From here, you can dive deeper into each setting. I'll update this post soon with deep dives focusing on each setting individually.
It all sounds very complicated, but I promise you: with a bit of practice, balancing the triangle becomes second nature. You'll quickly graduate from reacting to picturesque moments to anticipating them. That's when the creative possibilities really open up.